Jul 2, 2024
How to Work with Models in Photography

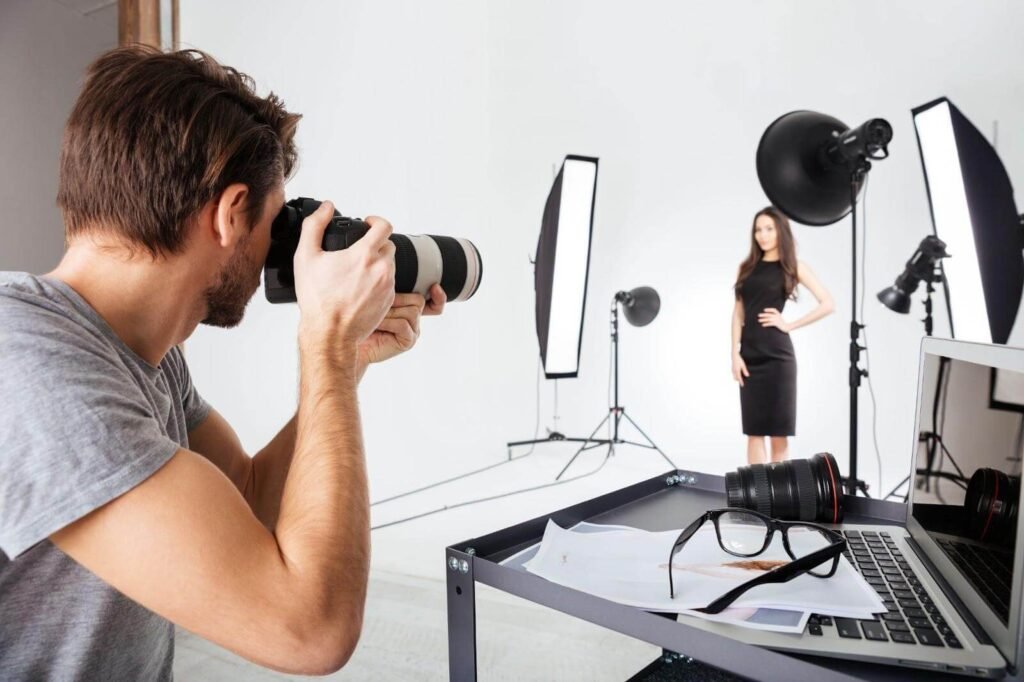
Working effectively with models is crucial for creating compelling and professional photographs. Whether you’re shooting portraits, fashion, or editorial work, understanding how to collaborate with models can elevate the quality of your photography. Here are some essential tips for photographers working with models.
Establishing Clear Communication and Expectations

Communication is key to a successful photoshoot. Before the session, discuss concepts, themes, and goals with the models to ensure everyone is on the same page. Clearly communicate your vision, style preferences, and any specific poses or expressions you want to capture. Encourage models to share their ideas and input to foster a collaborative atmosphere.

Building Rapport and Trust

Building rapport and establishing trust with models is essential for creating a comfortable and productive environment during photoshoots. Take the time to introduce yourself and get to know the models personally. Engage in friendly conversation to help them relax and feel confident in front of the camera. Show genuine interest in their comfort and well-being throughout the session.

Directing Poses and Expressions

Directing poses and expressions is a skill that photographers develop over time. Provide clear and concise instructions to guide models through different poses, expressions, and movements. Demonstrate poses yourself or use visual references, such as mood boards or sample images, to convey the desired look and feel. Encourage models to experiment with variations while maintaining authenticity.

Utilizing Natural and Artificial Light

Understanding light is fundamental in photography. Whether you’re shooting outdoors or in a studio, utilize natural and artificial light to enhance the mood and atmosphere of your photos. Experiment with different lighting techniques to sculpt the model’s features and create flattering shadows and highlights. Adjust your camera settings accordingly to achieve optimal exposure and balance.

Paying Attention to Composition and Background

Composition plays a significant role in creating visually appealing photographs. Pay attention to framing, symmetry, and background elements to complement the model and emphasize their presence. Experiment with shallow depth of field to isolate the model from distractions and draw focus to their expressions and attire. Use leading lines and framing techniques to guide the viewer’s eye towards the subject.

Reviewing and Providing Feedback

Reviewing images during the photoshoot allows you to provide immediate feedback and make necessary adjustments. Use the camera’s display or tethering software to review images with the models and discuss areas for improvement or changes in posing and expression. Offer positive reinforcement and constructive criticism to help models feel encouraged and motivated throughout the session.

Editing and Enhancing Photos

Post-processing plays a crucial role in refining and enhancing the final images. Use editing software to adjust colours, contrast, and clarity to achieve a polished and professional look. Remove minor imperfections or distractions to ensure the focus remains on the model and their expressions. Maintain a natural appearance while enhancing details to create impactful photographs.

Respecting Models’ Comfort and Boundaries

Respect and prioritize the models’ comfort, privacy, and dignity throughout the photoshoot. Avoid making inappropriate comments or requests that may make models feel uncomfortable or objectified. Obtain proper consent and permissions before using or sharing images, especially for commercial or promotional purposes. Uphold ethical standards and treat models with professionalism and respect at all times.

Conclusion

In conclusion, working with models in photography requires skill, patience, and empathy to capture authentic and compelling images. By establishing clear communication, building trust, and directing poses effectively, photographers can create memorable photographs that showcase the beauty and personality of their subjects. Respect models’ boundaries, embrace collaboration and strive for creativity to elevate your photography and create impactful visual narratives.

More Details
Jul 2, 2024
How to Capture Motion in Photography

Capturing motion in photography adds dynamism and energy to your images, whether you’re photographing sports, wildlife, or everyday scenes. Mastering techniques to convey motion effectively requires understanding camera settings, composition, and timing. Here’s how you can capture motion in your photographs.

Understanding Shutter Speed and Motion Blur

Shutter speed is crucial in capturing motion. A fast shutter speed (1/500 or faster) freezes action, making it ideal for sports or fast-moving subjects. On the other hand, a slower shutter speed (1/30 or slower) introduces motion blur, which can convey a sense of movement and fluidity. Experiment with different shutter speeds to achieve the desired effect in your photos.

Panning Technique for Dynamic Shots

Panning involves moving your camera horizontally along with a moving subject while using a slower shutter speed. This technique keeps the subject relatively sharp while blurring the background, creating a sense of speed and direction. Practice panning with different subjects, adjusting your technique to match their speed and movement.

Using Burst Mode for Action Sequences

Burst mode, also known as continuous shooting mode, allows you to capture a series of rapid-fire shots in quick succession. This is useful for capturing fleeting moments and sequences of action, such as a runner crossing the finish line or a bird taking flight. Review the burst shots later to select the best frames that capture the essence of motion.

Composition Techniques to Enhance Motion

Composition plays a significant role in conveying motion in photography. Use leading lines, such as roads or pathways, to guide the viewer’s eye through the image and create a sense of movement. Frame your subject off-centre to imply direction and allow space in front of moving subjects to create a sense of anticipation and movement within the frame.

Capturing Emotion and Energy

Motion photography isn’t just about technical settings; it’s also about capturing emotion and energy. Focus on facial expressions, body language, and interactions between subjects to tell a compelling story through your photos. Anticipate key moments and be ready to capture spontaneous gestures or expressions that reveal the intensity of movement.

Experimenting with Light and Shadow

Lighting can enhance or obscure motion in your photos. Experiment with different lighting conditions, such as natural sunlight, artificial light, or low-light environments, to create dramatic effects and emphasize movement. Adjust your exposure settings and use shadows to add depth and contrast to your motion-filled compositions.

Editing Techniques for Motion Photography

Post-processing allows you to refine and enhance motion in your photos. Use editing software to adjust contrast, clarity, and saturation to bring out details and intensify the sense of movement. Crop and straighten your images to emphasize the dynamic elements within the frame and remove distractions that may detract from the motion effect.

Practicing Patience and Persistence

Capturing compelling motion photography requires patience and persistence. Be prepared to wait for the right moment and take multiple shots to increase your chances of capturing a decisive moment. Review and analyze your photos to learn from each session and improve your skills in capturing motion effectively.

Conclusion

In conclusion, mastering motion photography involves mastering technical skills, experimenting with creative techniques, and developing a keen eye for capturing dynamic moments. By understanding shutter speed, using panning techniques, and employing composition strategies, you can convey movement and energy in your photographs that engage viewers and tell compelling visual stories. Embrace the challenges and rewards of capturing motion to create impactful images that capture the essence of action and movement.

More Details
Jul 2, 2024
Best Practices for Night Sky Photography

Night sky photography offers a mesmerizing view of celestial wonders, from stars and galaxies to the elusive auroras. Capturing stunning images of the night sky requires patience, technical know-how, and an understanding of the unique challenges posed by low-light conditions. Here are some best practices to help you master the art of night sky photography.

Understanding Night Sky Conditions

Understanding the conditions of the night sky is crucial for planning your photography sessions. Monitor weather forecasts and astronomical charts to choose nights with clear skies and minimal light pollution. Dark moonless nights are ideal for capturing the Milky Way and faint celestial objects, while moonlit nights can enhance landscapes but may obscure faint stars.

Choosing the Right Equipment and Settings

Use a sturdy tripod and a camera with manual settings for stability and control over your shots. A wide-angle lens with a fast aperture (f/2.8 or wider) is recommended to gather more light and capture expansive views of the night sky. Set your camera to manual mode and adjust settings such as ISO (typically between 800 and 3200), shutter speed (20-30 seconds for stars), and aperture to achieve proper exposure and sharpness.

Locating and Framing Celestial Objects

Before shooting, familiarize yourself with the night sky and identify key celestial objects or constellations you want to photograph. Use astronomy apps or star charts to locate stars, planets, or nebulae. Frame your shots with interesting foreground elements, such as landscapes or silhouettes, to add depth and context to your night sky images.

Focus Techniques for Night Sky Photography

Achieving sharp focus in low-light conditions can be challenging. Use manual focus and set your lens to infinity (∞) or use the live view mode to magnify stars and adjust focus manually. Test different focus points and apertures to ensure stars and distant objects appear crisp and well-defined in your photos.

Long Exposure and Star Trail Photography

Experiment with long exposures to capture star trails and create mesmerizing patterns of celestial motion across the night sky. Use a remote shutter release or timer to minimize camera shake during long exposures. Stack multiple exposures in post-processing to enhance star trails and reduce noise for cleaner, more detailed images.

Dealing with Noise and Post-Processing

Noise can be a challenge in night sky photography due to high ISO settings. Use noise reduction techniques in post-processing software to minimize graininess while preserving image detail. Adjust the white balance and colour temperature to enhance the natural hues of the night sky, from cool blues to deep purples and vivid greens of auroras.

Safety and Considerations for Night Sky Photography

Ensure your safety and respect local regulations when venturing out for night sky photography. Dress warmly and bring essential gear such as flashlights, extra batteries, and a first aid kit. Be mindful of wildlife and natural hazards in remote locations, and always leave no trace to preserve the beauty of natural landscapes.

Experimentation and Enjoyment

Night sky photography is a blend of art and science that rewards experimentation and creativity. Embrace trial and error to discover unique compositions and techniques that showcase the splendour of the cosmos. Enjoy the process of capturing fleeting moments of celestial beauty and sharing your passion for night sky photography with others.

Conclusion

In conclusion, mastering night sky photography requires patience, technical skill, and a deep appreciation for the wonders of the universe. By understanding night sky conditions, choosing the right equipment and settings, and employing effective techniques for focus and exposure, you can capture breathtaking images that evoke the mystery and grandeur of the cosmos. Embrace the challenges and joys of night sky photography to create stunning visual narratives that inspire awe and wonder in viewers.

More Details
Jul 2, 2024
Tips for Sports Photography

Sports photography requires skill, timing, and preparation to capture the energy and excitement of athletic events. Whether you’re photographing fast-paced action or emotional moments, these tips will help you elevate your sports photography game.

Understanding Your Sport and Equipment

Understanding the sport you’re photographing is essential for anticipating key moments and positioning yourself effectively. Familiarize yourself with the rules, players, and typical game flow to predict actions and reactions. Use a camera with fast autofocus and burst mode capabilities to capture quick movements and rapid sequences of action shots.

Choosing the Right Settings and Techniques

Adjust your camera settings to freeze motion and capture sharp, detailed images. Use a fast shutter speed (1/500 or faster) to freeze the action and avoid motion blur, especially in fast-paced sports like football or basketball. Select a wide aperture (low f-number) for a shallow depth of field to isolate your subject from the background and emphasize their presence.

Capturing Emotion and Expression

Sports photography isn’t just about action; it’s also about capturing emotion and expression. Focus on facial expressions, body language, and interactions between players to tell a compelling story through your photos. Look for moments of celebration, determination, or disappointment that convey the intensity and passion of sports.

Positioning and Composition

Position yourself strategically to capture the best angles and perspectives during the game. Experiment with different vantage points, such as sidelines, end zones, or elevated positions, to get unique shots that highlight the dynamics of the sport. Use leading lines and framing techniques to draw attention to your subject and create visually engaging compositions.

Anticipating and Reacting to Moments

Anticipate key moments and be ready to react quickly to capture decisive shots. Pre-focus on areas where action is likely to occur, such as goalposts or finish lines, to minimize autofocus lag. Keep your camera up to your eye and follow the action with smooth panning movements to maintain a sharp focus on moving subjects.

Handling Challenging Lighting Conditions

Sports events often take place in varying lighting conditions, from bright daylight to indoor arenas with artificial lighting. Adjust your ISO settings accordingly to maintain optimal exposure without compromising image quality. Use white balance presets or custom settings to correct colour casts and ensure accurate colour reproduction in different lighting environments.

Editing and Enhancing Sports Photos

Post-processing plays a crucial role in refining and enhancing your sports photos. Use editing software to crop, straighten, and fine-tune your compositions for better framing and visual impact. Adjust contrast, clarity, and saturation to enhance details and bring out the intensity of sports action. Avoid over-editing and aim for a natural look that preserves the authenticity of the moment.

Building Relationships and Ethics in Sports Photography

Build rapport with athletes, coaches, and organizers to gain access and capture intimate moments during games or events. Respect athletes’ privacy and rights by obtaining permission before publishing or sharing sensitive or personal images. Follow ethical guidelines and professional standards to maintain integrity and credibility in your sports photography practice.

Conclusion

In conclusion, sports photography is a dynamic and challenging field that requires technical skill, creativity, and a passion for capturing decisive moments. By understanding your sport, mastering camera settings and techniques, and focusing on emotion and composition, you can capture compelling images that resonate with viewers. Embrace the excitement and unpredictability of sports events to create memorable photographs that celebrate the athleticism, dedication, and spirit of athletes.

More Details
Jul 2, 2024
Best Ways to Photograph Architecture

Photographing architecture allows you to capture the beauty, symmetry, and character of buildings and structures. Whether you’re exploring historic landmarks or modern skyscrapers, mastering architectural photography requires a blend of technical skill and artistic vision. Here are some effective techniques and tips to enhance your architectural photography.

Understanding Light and Shadow in Architecture Photography

Lighting plays a crucial role in architectural photography. Pay attention to how natural and artificial light interacts with buildings throughout the day. Capture the play of light and shadow to add depth and dimension to your photos. Experiment with different times of day, such as early morning or late afternoon, to achieve soft, warm light that accentuates architectural details.

Choosing the Right Equipment and Lenses

Selecting the right equipment is essential for capturing detailed and well-composed architectural photos. Use a sturdy tripod to ensure sharpness and stability, especially in low-light conditions or for long exposures. Wide-angle lenses are ideal for capturing expansive views and emphasizing the grandeur of buildings. Consider using tilt-shift lenses for correcting perspective distortion in architectural photography.

Composition Techniques for Architectural Photography

Composition is key to creating visually appealing architectural photos. Use leading lines, symmetry, and patterns to guide the viewer’s eye through the image. Frame your shots carefully to include interesting foreground elements or reflections that complement the architecture. Experiment with different angles and perspectives to find the most compelling composition that highlights the building’s unique features.

Capturing Details and Textures

Focus on capturing architectural details and textures that showcase the building’s character and craftsmanship. Zoom in on intricate designs, textures of materials, or decorative elements that define the structure’s style. Use a narrow aperture (higher f-number) to ensure sharpness throughout the image, especially when photographing close-up details.

Utilizing Reflections and Symmetry

Reflections and symmetry can add visual interest and balance to architectural photography. Look for reflective surfaces, such as glass facades or water bodies, that create mirror-like effects. Use symmetry to create a sense of harmony and balance in your compositions. Symmetrical buildings or elements can provide a strong focal point that draws the viewer’s attention.

Editing and Enhancing Architectural Photos

Post-processing plays a vital role in refining architectural photos. Use editing software to adjust exposure, contrast, and colour balance to enhance the mood and atmosphere of your images. Correct perspective distortions or lens aberrations to ensure straight lines and balanced proportions. Maintain a natural look while enhancing details and textures to create polished and professional architectural photographs.

Exploring Different Architectural Styles and Periods

Explore and appreciate different architectural styles and periods to diversify your portfolio. Whether it’s capturing the intricate Gothic details of cathedrals or the minimalist aesthetics of modern architecture, each style offers unique challenges and opportunities for creative expression. Research the history and significance of the buildings you photograph to deepen your understanding and appreciation of architectural photography.

Showcasing Architectural Context and Environment

Context is essential in architectural photography to convey the building’s relationship with its surroundings. Capture wide-angle shots that include the building in its urban or natural environment. Show how architecture interacts with landscapes, streetscapes, or cityscapes to tell a broader story about its purpose and significance.

Conclusion

In conclusion, mastering architectural photography requires technical expertise, creativity, and an eye for detail. By understanding light and shadow, choosing the right equipment, and employing effective composition techniques, you can capture stunning images that showcase the beauty and essence of architectural wonders. Experiment with different styles, perspectives, and editing techniques to develop your unique photographic style. Whether you’re capturing iconic landmarks or hidden gems, architectural photography offers endless opportunities for exploration and creative expression.

More Details
Jul 2, 2024
How to Photograph Pets Successfully

Photographing pets can be a delightful yet challenging experience, capturing their unique personalities and fleeting moments requires patience, creativity, and preparation. Whether you’re photographing cats, dogs, or exotic pets, these tips will help you capture memorable images that showcase their charm and character.

Understanding Your Pet’s Behavior

Understanding your pet’s behaviour is crucial for successful pet photography. Each animal, whether a playful kitten or a loyal dog, has its unique personality and quirks. Taking the time to observe and interact with them before picking up your camera can make a significant difference in your photoshoot. By doing so, you gain insights into their habits, preferences, and behaviours. This preparation allows you to anticipate their movements, expressions, and reactions, enabling you to capture authentic and candid moments that showcase their true character. Whether it’s a curious glance, a playful leap, or a moment of affection, understanding your pet’s behaviour helps you capture images that not only depict their physical appearance but also reflect their individuality and spirit. Building this connection through observation and interaction fosters trust and comfort, creating a positive environment where your pet can shine in front of the camera.

Choosing the Right Environment and Lighting

Selecting the right environment and lighting is essential for pet photography. Choose a familiar and comfortable setting where your pet feels relaxed and at ease. Natural light is often the best choice, as it enhances fur textures and colours. Avoid harsh midday sun and opt for softer, diffused light during the morning or late afternoon for flattering portraits.

Engaging Your Pet

Engaging your pet during the photo shoot is key to capturing lively and expressive photos. Use toys, treats, or familiar commands to grab their attention and encourage playful interactions. Capture their natural curiosity, excitement, or affectionate moments with you or other pets to add depth and storytelling to your images.

Patience and Timing

Patience is essential when photographing pets, as they may not always cooperate or stay still. Be patient and wait for the right moment to click the shutter. Timing is crucial for capturing spontaneous actions or expressions that reveal your pet’s personality. Take multiple shots in rapid succession to increase your chances of capturing that perfect moment.

Eye-Level Perspective

For engaging pet portraits, photograph them at their eye level. This perspective creates a more intimate connection between the viewer and your pet, showcasing their facial expressions and unique features. Get down on the ground or use a low stool to achieve eye-level shots that highlight your pet’s perspective and personality.

Using Props and Accessories

Props and accessories can add fun and personality to your pet photos. Experiment with toys, clothing, or themed props that reflect your pet’s interests or character. However, ensure that props are safe and comfortable for your pet, and avoid overwhelming them with too many distractions. Props should complement your pet’s natural beauty and enhance the overall composition of your photos.

Focusing and Composition

Pay attention to focusing and composition to create visually appealing pet portraits. Use a wide aperture (low f-number) to blur the background and draw attention to your pet’s face and eyes. Focus on the eyes to capture sharp, expressive details that convey emotions. Experiment with different angles and perspectives to find the most flattering and dynamic compositions.

Post-Processing and Editing

After capturing your pet photos, enhance them through post-processing and editing. Adjust colours, contrast, and exposure to bring out the best in your images while maintaining a natural look. Remove distractions or imperfections that detract from your pet’s charm. Use editing software to crop, straighten, and refine your compositions for polished and professional pet portraits.

Building Trust and Comfort

Building trust and comfort with your pet is essential for successful pet photography sessions. Create a positive and relaxed atmosphere by rewarding good behaviour, providing breaks, and respecting their limits. Establishing a bond of trust ensures that your pet feels safe and enjoys the experience, resulting in more natural and expressive photos.

Sharing and Celebrating

Finally, share and celebrate your pet photos with pride. Share your best images with friends, and family, or on social media to showcase your pet’s personality and charm. Participate in pet photography contests or create a photo album to cherish and commemorate special moments with your beloved pet.

Conclusion

In conclusion, photographing pets successfully requires a combination of technical skills, creativity, and an understanding of your pet’s behaviour. By preparing your environment, engaging your pet, and using effective photography techniques, you can capture beautiful and expressive images that highlight their unique personalities. With patience, practice, and a love for animals, you’ll create lasting memories through pet photography that celebrate the joy and companionship they bring to our lives.

More Details
Jul 2, 2024
Best Photography Gadgets and Accessories in 2024

Best Photography Gadgets and Accessories in 2024 are essential for photographers looking to elevate their skills and capture stunning images. In the ever-evolving world of photography, having the right gadgets and accessories can make a significant difference. Whether you’re a professional or a hobbyist, these tools can enhance your creativity and efficiency. In this article, we’ll explore some of the top photography gadgets and accessories in 2024 that every photographer should consider.

Photography Gadgets and Accessories

Must-Have Camera Accessories

Tripods and Stabilizers

Firstly, tripods and stabilizers are crucial for capturing sharp and stable images. They are especially useful for long exposure shots and videos. In 2024, the best tripods and stabilizers include:

  1. Manfrotto Befree Advanced Tripod
  2. DJI Ronin-SC Stabilizer
  3. Peak Design Travel Tripod

These models offer excellent stability, portability, and ease of use.

Lens Filters

Next, lens filters can significantly enhance your photos by controlling light and reducing reflections. Some of the best lens filters in 2024 are:

  1. B+W 77mm XS-Pro Digital ND Vario MRC-Nano Filter
  2. Hoya ProND Filter
  3. Tiffen Circular Polarizer

These filters help improve contrast, reduce glare, and manage exposure in various lighting conditions.

Essential Lighting Equipment

External Flashes

External flashes are essential for low-light situations and can provide better control over lighting. In 2024, top external flashes include:

  1. Canon Speedlite 600EX II-RT
  2. Nikon SB-5000 AF Speedlight
  3. Godox V1 Flash

These flashes offer high performance, versatility, and reliable wireless control.

LED Light Panels

Moreover, LED light panels are versatile tools for both photography and videography. The best LED light panels in 2024 are:

  1. Neewer 660 LED Video Light
  2. Aputure Amaran AL-MW Mini LED
  3. Lume Cube 2.0

These panels provide adjustable brightness and color temperature, making them perfect for different shooting environments.

Innovative Camera Gadgets

Camera Drones

Drones have revolutionized photography by providing unique aerial perspectives. The best camera drones in 2024 are:

  1. DJI Air 2S
  2. Autel Robotics EVO Lite+
  3. Parrot Anafi FPV

These drones offer high-resolution cameras, advanced stabilization, and intelligent flight modes.

Gimbal Stabilizers

Gimbal stabilizers are excellent for capturing smooth videos and motion shots. In 2024, top gimbal stabilizers include:

  1. Zhiyun Crane 3S
  2. DJI RS 2
  3. FeiyuTech AK2000S

These stabilizers provide precise control and stabilization, making them ideal for dynamic shooting.

Storage and Memory Solutions

High-Speed Memory Cards

High-speed memory cards are essential for storing large files and ensuring fast data transfer. The best memory cards in 2024 are:

  1. SanDisk Extreme PRO SDXC UHS-II
  2. Lexar Professional 2000x SDHC/SDXC UHS-II
  3. Sony SF-G Tough Series UHS-II

These memory cards offer high capacity, fast write speeds, and durability.

Portable Hard Drives

Additionally, portable hard drives are crucial for backing up your photos and videos. The best portable hard drives in 2024 include:

  1. LaCie Rugged USB-C
  2. Samsung T7 Touch Portable SSD
  3. Western Digital My Passport SSD

These drives provide ample storage, fast transfer speeds, and robust protection against physical damage.

Accessories for Enhanced Shooting Experience

Camera Straps

Comfortable and secure camera straps can make a big difference during long shooting sessions. Top camera straps in 2024 are:

  1. Peak Design Slide Camera Strap
  2. BlackRapid Breathe Sport Camera Strap
  3. Joby UltraFit Sling Strap

These straps offer ergonomic designs, durability, and easy adjustability.

Camera Bags

Lastly, a good camera bag protects your gear and provides convenient storage. The best camera bags in 2024 include:

  1. Lowepro ProTactic 450 AW II
  2. Think Tank Photo Airport Security V3.0
  3. Peak Design Everyday Backpack V2

These bags offer excellent protection, organization, and comfort for transporting your equipment.

Conclusion

In conclusion, the Best Photography Gadgets and Accessories in 2024 can greatly enhance your photography experience. From tripods and stabilizers to drones and LED light panels, these tools help you capture stunning images and videos. Remember to invest in high-quality storage solutions, comfortable straps, and reliable camera bags to keep your gear safe and accessible. By incorporating these gadgets and accessories into your photography routine, you’ll be well-equipped to take your skills to the next level. Whether you’re shooting landscapes, portraits, or action shots, these tools will help you achieve professional results with ease.

More Details
Jul 2, 2024
How to Use Reflectors in Photography

Reflectors are valuable tools in photography for manipulating light and enhancing the quality of your images. Understanding how to use reflectors effectively can significantly improve your portraits and other types of photography. Here’s a guide to mastering reflectors in your photography sessions.

Understanding Reflectors in Photography

Reflectors are surfaces that bounce light onto your subject, filling in shadows and creating a more even illumination. They come in various sizes, shapes, and materials, such as white, silver, gold, and translucent. Each type of reflector produces a different effect, altering the warmth, intensity, and direction of the reflected light.

Choosing the Right Reflector

Selecting the appropriate reflector depends on your shooting conditions and desired outcome. A white reflector provides soft, neutral light suitable for most portraits and close-ups. Silver reflectors produce a more intense and cooler light, ideal for enhancing contrast and highlights. Gold reflectors add warmth and richness to skin tones, perfect for sunset or golden-hour shoots. Translucent reflectors diffuse light, reducing harsh shadows and creating a softer, more flattering effect.

Positioning Reflectors for Best Results

Proper positioning of reflectors is crucial for achieving desired lighting effects. Place reflectors strategically to bounce light onto the shadow side of your subject’s face or object. Experiment with different angles and distances to control the intensity and direction of the reflected light. Adjust the reflector’s position until you achieve a balanced illumination that complements your composition.

Using Reflectors Outdoors

Reflectors are particularly useful in outdoor photography, where natural light can be harsh or uneven. During sunny conditions, position a reflector to bounce sunlight onto your subject’s face, filling in shadows and reducing contrast. In overcast or low-light situations, use a reflector to enhance ambient light and add warmth and definition to your images. Reflectors allow you to harness natural light creatively and achieve professional-quality results without relying solely on artificial lighting.

Enhancing Details and Texture

Reflectors are not only for illuminating shadows but also for enhancing details and textures in your subjects. Use a reflector to highlight intricate patterns, textures, or reflective surfaces, such as water or glass. By manipulating light with reflectors, you can draw attention to specific elements within your composition and create visually compelling images.

Balancing Multiple Light Sources

In studio or controlled lighting environments, reflectors can help balance multiple light sources effectively. Use reflectors to fill in shadows created by primary light sources, such as strobes or softboxes. This technique ensures even lighting across your subject and minimizes harsh shadows or overly contrasted areas. Experiment with different combinations of reflectors and light sources to achieve the desired mood and atmosphere in your photographs.

Experimenting with Creative Effects

Beyond their practical use in lighting, reflectors offer creative possibilities in photography. Experiment with unconventional reflector materials or colours to achieve unique effects and atmospheres in your images. Combine reflectors with natural or artificial light sources to create dramatic contrasts or subtle highlights. Embrace experimentation and creativity to develop your signature style using reflectors as versatile tools in your photographic toolkit.

Conclusion

In conclusion, reflectors are essential accessories for photographers seeking to manipulate light creatively and enhance the quality of their images. By understanding the different types of reflectors, choosing the right one for your shooting conditions, and mastering positioning techniques, you can effectively control lighting and achieve professional results in various photographic genres. Whether indoors or outdoors, reflectors offer flexibility in shaping light, filling in shadows, and accentuating details. Incorporate reflectors into your photography workflow to elevate your portraits, landscapes, and still-life compositions with balanced and flattering illumination. With practice and experimentation, you’ll discover the transformative power of reflectors in capturing stunning photographs that showcase your artistic vision and technical skill.

More Details
Jul 2, 2024
Best Camera Bags for Travel Photography

Travel photography is an exciting way to capture the beauty and diversity of the world. However, carrying your camera gear safely and comfortably is crucial. Best camera bags for travel photography can make a huge difference in your experience. These bags protect your equipment, provide easy access, and ensure you’re comfortable on the go. In this guide, we’ll explore some of the top camera bags for travel photography and offer tips to help you choose the perfect one.

Camera Bags for Travel Photography

Why a Good Camera Bag Matters

Protecting Your Gear

First and foremost, a good camera bag protects your valuable equipment from damage. Travel can be unpredictable, with bumps, falls, and harsh weather conditions. Therefore, a sturdy, well-padded bag is essential.

Comfort and Convenience

Additionally, carrying heavy camera gear can be exhausting. A well-designed camera bag with ergonomic features can make your travels more comfortable. It should distribute weight evenly and offer easy access to your gear.

Types of Camera Bags

Backpacks

Backpacks are ideal for travel photography because they distribute weight evenly across your shoulders. They also have plenty of space for your camera, lenses, and other accessories.

Messenger Bags

Messenger bags are stylish and provide quick access to your gear. They are perfect for city travel and shorter trips where you don’t need to carry a lot of equipment.

Sling Bags

Sling bags are a hybrid between backpacks and messenger bags. They offer easy access like messenger bags but are carried like backpacks, making them a versatile choice.

Top Picks for Best Camera Bags for Travel Photography

1. Peak Design Everyday Backpack V2

The Peak Design Everyday Backpack V2 is a favorite among travel photographers. It features customizable dividers, weatherproof construction, and a sleek design. The backpack is available in different sizes to suit your needs.

2. Lowepro ProTactic 450 AW II

The Lowepro ProTactic 450 AW II offers excellent protection and versatility. It has a rugged exterior, multiple access points, and a built-in All Weather AW Cover to protect your gear from rain and dust.

3. Think Tank Photo StreetWalker HardDrive V2.0

The Think Tank Photo StreetWalker HardDrive V2.0 is a spacious backpack that can accommodate a large camera setup. It has a comfortable harness system and plenty of pockets for organization.

4. Tenba DNA 15 Messenger Bag

The Tenba DNA 15 Messenger Bag is a stylish and functional option for urban travel photography. It has a weather-resistant exterior, customizable interior, and quick access zippers.

5. MindShift Gear BackLight 26L

The MindShift Gear BackLight 26L is perfect for outdoor adventures. It offers rear-panel access to your gear, which keeps the bag’s harness clean when you set it down. It also has ample space for personal items and camera gear.

Tips for Choosing the Best Camera Bag for Travel Photography

Consider Your Gear

Firstly, think about the camera gear you’ll be carrying. Ensure the bag has enough space and compartments to accommodate your camera, lenses, and accessories.

Check for Comfort

Next, look for bags with padded straps and ergonomic designs. A comfortable bag will make long travel days much more bearable.

Look for Durability

Durability is key for travel bags. Opt for bags made from high-quality, weather-resistant materials to protect your gear from the elements.

Access and Organization

Easy access to your gear is crucial. Choose bags with multiple access points and well-organized compartments to keep your gear within reach.

Style and Personal Preference

Lastly, consider your style and personal preference. Your camera bag should not only be functional but also something you enjoy carrying around.

Additional Features to Consider

Security Features

Some camera bags come with security features like lockable zippers and anti-theft designs. These can be especially useful when traveling in crowded places.

Expandable Storage

Expandable storage options allow you to carry more gear when needed. Look for bags with expandable compartments or additional accessory pockets.

Tripod Holders

If you use a tripod, check for bags with dedicated tripod holders. This will make it easier to carry your tripod without taking up space inside the bag.

Laptop Compartment

For those who edit photos on the go, a laptop compartment is essential. Ensure the bag has a padded section to protect your laptop.

Conclusion

Choosing the best camera bag for travel photography can enhance your travel experience significantly. By considering factors like protection, comfort, and accessibility, you can find the perfect bag for your needs. Our top picks, including the Peak Design Everyday Backpack V2 and the Lowepro ProTactic 450 AW II, offer a combination of style, functionality, and durability. Remember to consider additional features like security, expandable storage, and tripod holders to ensure your bag meets all your requirements. Happy travels and happy shooting!


By following these tips and selecting one of our recommended camera bags, you can ensure your gear is well-protected and easily accessible, making your travel photography experience more enjoyable and successful.

4o

More Details
Jul 2, 2024
How to Master Landscape Photography

Landscape photography captures the beauty of natural scenery, from sweeping vistas to serene sunsets. Mastering this art requires both technical skill and creative vision. Whether you’re a beginner or looking to refine your techniques, these tips will help you elevate your landscape photography to the next level.

Understand Your Gear

Understanding your camera and equipment is essential in landscape photography. Use a wide-angle lens to capture expansive scenes and emphasize foreground elements. Familiarize yourself with aperture, shutter speed, and ISO settings to achieve the desired depth of field and exposure. Mastering your gear allows you to capture sharp, well-exposed images in various lighting conditions.

Plan Your Shoots

Successful landscape photography often involves careful planning. Research locations, study maps, and consider the best times for lighting and weather conditions. Arrive early to scout compositions and anticipate changes in natural light. Planning increases your chances of capturing stunning landscapes with optimal lighting and atmosphere.

Use Leading Lines and Foreground Interest

Create depth and perspective in your landscape photos by incorporating leading lines and foreground interest. Leading lines guide the viewer’s eye through the image, enhancing composition and adding visual interest. Rocks, trees, or other elements in the foreground can provide context and scale, making your photos more dynamic and engaging.

Experiment with Composition

Composition plays a crucial role in landscape photography. Experiment with different perspectives, such as low angles or elevated viewpoints, to capture unique compositions. Use the rule of thirds to place key elements off-centre for a balanced composition. Balance foreground, middle ground, and background elements to create a sense of depth and balance in your images.

Capture the Golden Hours

The golden hours—shortly after sunrise and before sunset—offer soft, warm light that enhances landscapes with rich colours and long shadows. Take advantage of these times to capture dramatic skies, vibrant hues, and atmospheric effects. Be prepared to shoot quickly as lighting conditions change rapidly during these magical moments.

Master Exposure and Dynamic Range

Achieving proper exposure and managing dynamic range are critical in landscape photography. Use exposure bracketing to capture a range of exposures and blend them in post-processing for optimal detail in highlights and shadows. Graduated neutral density filters can help balance exposure between the sky and foreground, reducing the need for extensive editing.

Post-Processing and Editing

Post-processing is an integral part of landscape photography. Use editing software to fine-tune colours, contrast, and sharpness while maintaining a natural look. Adjust the white balance to enhance mood and atmosphere. Crop and straighten images to improve composition and remove distractions. Develop a consistent editing workflow that enhances your photos while preserving their authenticity.

Embrace Changing Conditions

Weather and natural conditions can dramatically affect landscape photography. Embrace changing weather patterns, from dramatic storm clouds to misty mornings, to add mood and drama to your photos. Be patient and adaptable, waiting for the right moment to capture unique and evocative landscapes.

Study and Learn from Others

Continuous learning is key to mastering landscape photography. Study the work of renowned landscape photographers to understand their techniques and creative approaches. Attend workshops, join photography groups, and seek constructive feedback to refine your skills. Incorporate new ideas and techniques into your photography style to continually improve and evolve.

Practice and Patience

Like any art form, mastering landscape photography takes practice and patience. Spend time exploring different locations, experimenting with techniques, and honing your observational skills. Be persistent in refining your craft and learning from both successes and challenges. With dedication and perseverance, you’ll develop your unique style and create captivating landscape images.

Conclusion

In conclusion, mastering landscape photography requires technical proficiency, artistic vision, and a deep appreciation for natural beauty. By understanding your gear, planning your shoots, and mastering composition and lighting, you can capture breathtaking landscapes that resonate with viewers. Embrace continuous learning, adapt to changing conditions, and refine your post-processing techniques to elevate your photography skills. With passion and commitment, you’ll create compelling landscape images that reflect your creativity and love for the outdoors.

More Details