Jul 3, 2024
Tips for Portrait Photography Lighting

Lighting is one of the most crucial elements in portrait photography, as it shapes the subject, creates mood, and highlights features. Here are some essential tips for mastering lighting in portrait photography:

Understand Natural Light

Natural light is often the best and most readily available light source for portrait photography. The quality of natural light changes throughout the day, with golden hours (shortly after sunrise and before sunset) providing soft, warm light that is flattering for portraits. Midday sun can be harsh, creating strong shadows; in these cases, find open shade or use diffusers to soften the light.

Use Reflectors

Reflectors are inexpensive and highly effective tools for manipulating light. They can bounce light back onto the subject, filling in shadows and providing a more balanced illumination. Silver reflectors provide a strong, crisp light, while gold reflectors add a warm tone. White reflectors give a soft, neutral light, and black reflectors can be used to deepen shadows.

Experiment with Backlighting

Backlighting can create a beautiful halo effect around the subject, especially when the light source is the sun. Position the subject with their back to the light and adjust your exposure to avoid overexposing the background. You may need to use a reflector or fill light to illuminate the subject’s face and avoid them appearing as a silhouette.

Use Softboxes and Umbrellas

Softboxes and umbrellas are essential tools for studio lighting. They diffuse light from a flash or continuous light source, creating soft, even illumination. Softboxes provide more directional light, while umbrellas spread light over a wider area. Both are excellent for reducing harsh shadows and creating flattering light for portraits.

Try Rembrandt Lighting

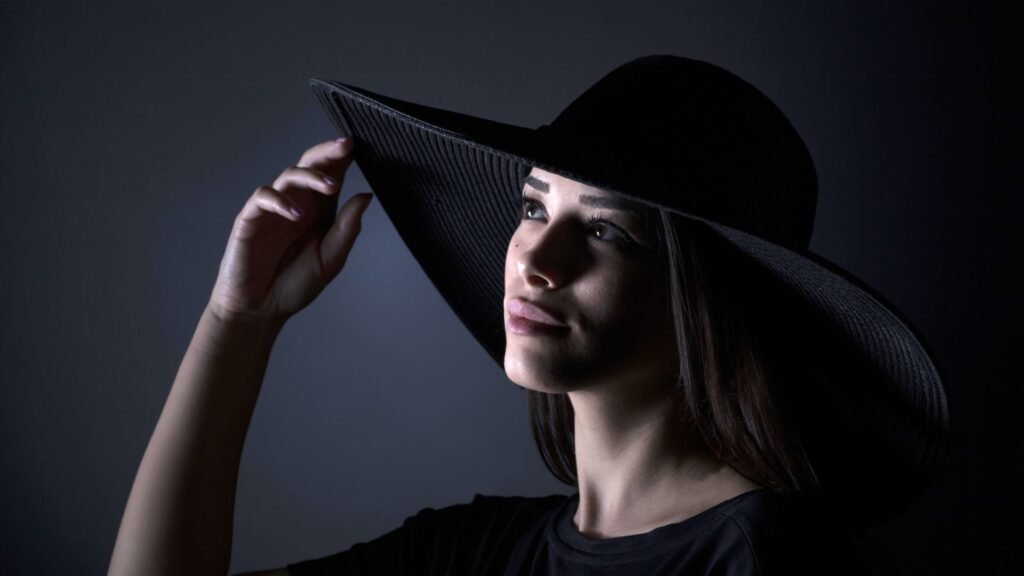
Rembrandt lighting is a classic technique named after the painter Rembrandt, known for his dramatic use of light and shadow. To achieve this, position the main light source at about 45 degrees from the subject and slightly above eye level. This creates a triangular patch of light on the cheek opposite the light source, adding depth and dimension to the portrait.

Use a Hair Light or Rim Light

A hair light or rim light is placed behind the subject, aimed at the back of the head or shoulders. This adds separation between the subject and the background, giving a three-dimensional feel to the image. It also adds a touch of glamour by highlighting the edges of the subject’s hair and shoulders.

Control Light with Grids and Snoots

Grids and snoots are modifiers that control the spread of light, creating more focused and directional illumination. Grids attach to softboxes or lights, narrowing the beam and reducing light spill. Snoots create a spotlight effect, directing light precisely where you want it. Both tools are useful for creating dramatic lighting and emphasizing specific parts of the portrait.

Use Catchlights

Catchlights are reflections of the light source in the subject’s eyes, adding life and sparkle to the portrait. Position your light source to ensure that catchlights are visible. They are typically placed at the 10 or 2 o’clock positions within the eyes, which is often the most natural and aesthetically pleasing placement.

Experiment with Color Gels

Color gels are transparent colored materials placed over lights to change the color of the illumination. They can add a creative touch to your portraits by altering the mood and atmosphere. Use gels subtly to enhance skin tones or dramatically to create artistic and surreal effects.

Balance Ambient and Artificial Light

When shooting in environments with existing light sources, balance ambient light with your artificial lighting. This can be achieved by adjusting the power of your flash or continuous light and using the camera’s exposure settings. Balancing the two light sources ensures that the subject is well-lit without overexposing or underexposing the background.

Use Multiple Light Sources

For more complex lighting setups, use multiple light sources to create a well-rounded portrait. A common three-point lighting setup includes a key light (main light source), a fill light (to reduce shadows), and a backlight (to separate the subject from the background). This setup provides depth and dimension to the portrait, creating a professional look.

Practice and Experiment

Mastering lighting in portrait photography requires practice and experimentation. Try different lighting setups, angles, and modifiers to see how they affect your portraits. Don’t be afraid to break traditional lighting rules and develop your unique style.

In conclusion, understanding and controlling light is essential for creating stunning portraits. By utilizing natural light, reflectors, softboxes, and various lighting techniques, you can enhance your portrait photography and capture beautiful, compelling images.

More Details
Jul 3, 2024
Tips for Starting a Photography Blog

Photography Blog ventures are a fantastic way to showcase your work, share your passion, and connect with others who love photography. Starting a photography blog might seem overwhelming, but with the right tips and a clear plan, you can create an engaging and successful blog. In this article, we will discuss essential tips for starting your photography blog, covering everything from choosing a niche to promoting your blog effectively.

Starting a Photography Blog

Choosing Your Niche

Firstly, deciding on a niche is crucial for your photography blog. A niche helps you focus your content and attract a specific audience interested in that topic.

  • Identify Your Passion: Think about what aspects of photography you are most passionate about. It could be landscape photography, portrait photography, street photography, or even wildlife photography. Choose a niche that excites you.
  • Research Your Audience: Understand who your potential readers are. What are their interests? What kind of content are they looking for? This will help you tailor your blog to meet their needs.
  • Analyze Competitors: Look at other photography blogs in your niche. What are they doing well? What gaps can you fill with your content?

Setting Up Your Blog

Now that you have chosen your niche, it’s time to set up your photography blog.

  • Choose a Blogging Platform: Popular platforms like WordPress, Blogger, and Wix are user-friendly and offer various customization options.
  • Pick a Domain Name: Your domain name should be easy to remember and reflect your niche. Try to include keywords related to photography in your domain name.
  • Select a Hosting Service: Reliable hosting services like Bluehost, SiteGround, and HostGator will ensure your blog runs smoothly and loads quickly.

Designing Your Blog

Next, the design of your photography blog plays a significant role in attracting and retaining readers.

  • Use a Clean Layout: A clean and simple layout makes your blog easy to navigate. Avoid clutter and ensure your images are displayed prominently.
  • Optimize for Mobile: Many people will access your blog from their smartphones. Make sure your blog is mobile-friendly.
  • Use High-Quality Images: Your photography blog should showcase your best work. Use high-resolution images to highlight your skills.

Creating Engaging Content

Content is king, especially in a photography blog. Here are some tips for creating engaging content:

  • Share Your Experiences: Write about your photography adventures, the challenges you faced, and how you overcame them. Personal stories resonate with readers.
  • Provide Tutorials: Teach your readers new photography techniques. Step-by-step guides and video tutorials are very popular.
  • Review Photography Gear: Share your thoughts on cameras, lenses, and other photography equipment. Honest reviews can help your readers make informed decisions.

Promoting Your Blog

Promotion is key to attracting readers to your photography blog. Here are some strategies:

  • Utilize Social Media: Share your blog posts on platforms like Instagram, Facebook, and Twitter. Use relevant hashtags to reach a wider audience.
  • Engage with Other Bloggers: Comment on other photography blogs and join photography forums. Building relationships with other bloggers can help you gain exposure.
  • SEO Optimization: Use keywords strategically in your blog posts. This will help your blog rank higher in search engine results.

Building a Community

Building a community around your photography blog can lead to long-term success.

  • Encourage Comments: Ask your readers to leave comments and share their thoughts. Respond to their comments to build a connection.
  • Create a Newsletter: Regular newsletters can keep your readers updated on new blog posts, photography tips, and upcoming events.
  • Host Contests and Giveaways: Engaging activities like photo contests and giveaways can attract more readers and keep them coming back.

Monetizing Your Blog

Once your photography blog starts gaining traction, you might consider monetizing it.

  • Affiliate Marketing: Promote photography gear and earn commissions on sales through affiliate links.
  • Sell Your Photos: Offer your photos for sale directly from your blog. You can also sell photo prints or digital downloads.
  • Offer Photography Services: Advertise your photography services, such as photo shoots, workshops, or one-on-one coaching sessions.

Keeping Your Blog Updated

Lastly, consistency is key to maintaining a successful photography blog.

  • Set a Posting Schedule: Decide how often you will post new content. Whether it’s once a week or twice a month, consistency helps build a loyal audience.
  • Update Old Content: Regularly update your older blog posts to ensure they remain relevant and accurate.
  • Stay Inspired: Follow other photographers, read photography books, and continually explore new photography techniques to keep your content fresh and exciting.

Conclusion

Starting a photography blog can be an exciting and rewarding journey. By following these tips and focusing on creating high-quality, engaging content, you can build a blog that showcases your photography skills and connects with a passionate audience. Remember, consistency and authenticity are key. Happy blogging!

More Details
Jul 3, 2024
Tips for Photographing Food

Food photography is an art that combines culinary appreciation with visual creativity. Whether you’re a professional photographer, a food blogger, or just someone who loves taking pictures of their meals, these tips will help you capture mouth-watering images of food.

Use Natural Light

Natural light is your best friend in food photography. It provides a soft, even illumination that enhances the textures and colors of the food. Set up your shot near a window with diffused light, using curtains or a white sheet to soften harsh sunlight. Avoid using the built-in flash on your camera, as it can create unflattering shadows and reflections.

Choose the Right Background

The background of your food photo should complement the dish without distracting from it. Simple, neutral backgrounds like wooden tables, marble countertops, or plain placemats work well. Consider using textured surfaces that add depth without overpowering the main subject. The goal is to make the food stand out.

Style Your Food

Presentation is key in food photography. Arrange the food thoughtfully to highlight its most appealing aspects. Use garnishes, sauces, and props like cutlery or napkins to enhance the visual interest. Pay attention to colors and contrasts, and don’t be afraid to rearrange elements until you’re satisfied with the composition.

Experiment with Angles

Different angles can dramatically change the look of your food photos. Common angles include the overhead (or flat lay) shot, the 45-degree angle, and the eye-level shot. Overhead shots work well for flat dishes like pizzas and salads, while the 45-degree angle is great for showing depth and layers in a dish. Eye-level shots are ideal for capturing the height and structure of taller items like burgers or cakes.

Focus on the Details

Sharp focus is essential in food photography. Use a macro lens or the macro setting on your camera to capture fine details like the texture of a pastry or the crispness of a vegetable. Ensure that the main subject is in sharp focus, while the background can be softly blurred to create a pleasing bokeh effect.

Mind the Composition

Good composition can make or break a food photo. The rule of thirds is a helpful guideline: imagine your frame divided into a 3×3 grid, and place the main elements of your dish along these lines or at their intersections. This creates a balanced and visually appealing image. Also, consider leading lines and symmetry to guide the viewer’s eye through the photo.

Control the Color Temperature

The color temperature of your light source can affect the mood of your photo. Natural light is usually on the cooler side, while artificial light can be warm. Adjust the white balance on your camera to ensure that the colors in your photo are true to life. Warm tones can make a dish look more inviting, while cooler tones can give a clean, fresh feel.

Use Reflectors and Diffusers

Reflectors and diffusers help control the light in your setup. Reflectors bounce light back onto the subject, reducing shadows and adding highlights. White foam boards, mirrors, or even a white sheet of paper can serve as reflectors. Diffusers soften harsh light and create a more even illumination. Professional diffusers are available, but a translucent curtain or parchment paper can also work in a pinch.

Post-Processing is Key

Editing is an important step in food photography. Use photo editing software to adjust exposure, contrast, and color balance. Enhance the sharpness and clarity to make the textures pop, and remove any distracting elements from the background. Be careful not to over-edit, as this can make the food look unnatural.

Tell a Story

Great food photography often tells a story. Think about the context of the dish – where it comes from, how it’s made, and who might be enjoying it. Incorporate props that hint at these elements, such as ingredients, cooking utensils, or a beautifully set table. This adds depth to your photo and engages the viewer’s imagination.

Conclusion

In conclusion, photographing food effectively requires attention to detail, an understanding of light, and a knack for composition. By following these tips, you can capture stunning images that showcase the beauty and deliciousness of your culinary creations.

More Details
Jul 3, 2024
Top Photography Channels on YouTube

YouTube is an invaluable resource for photographers of all skill levels, offering tutorials, gear reviews, inspiration, and tips from industry experts. Here are some of the top photography channels that can help you improve your skills and stay updated on the latest trends:

Peter McKinnon

Peter McKinnon is one of the most popular photography and videography influencers on YouTube. His channel features a wide range of content, including tutorials, gear reviews, and vlogs that provide both inspiration and practical advice. McKinnon’s energetic style and professional insights make his videos highly engaging and educational.

Fstoppers

Fstoppers is a comprehensive resource for photographers, offering tutorials, industry news, and gear reviews. The channel covers various genres of photography, from portraits to landscapes, and provides tips on lighting, composition, and post-processing. Fstoppers’ content is designed to help photographers of all levels improve their craft.

Jessica Kobeissi

Jessica Kobeissi is known for her portrait photography tutorials and behind-the-scenes videos. Her channel offers tips on posing, lighting, and editing, making it an excellent resource for those interested in fashion and portrait photography. Kobeissi’s approachable teaching style and creative insights make her content accessible and inspiring.

The Art of Photography

Run by Ted Forbes, The Art of Photography dives deep into the history, theory, and practice of photography. Forbes covers a broad range of topics, including camera reviews, tutorials, and discussions about influential photographers and their work. This channel is perfect for those looking to expand their knowledge and appreciation of photography as an art form.

Tony & Chelsea Northrup

Tony and Chelsea Northrup offer a mix of photography tutorials, gear reviews, and live Q&A sessions on their channel. They cover a wide range of topics, from basic photography skills to advanced techniques, and provide insights into the latest camera technology. Their comprehensive approach makes their channel a valuable resource for photographers of all levels.

Mango Street

Mango Street, created by Rachel Gulotta and Daniel Inskeep, focuses on delivering concise and practical photography tutorials. Their videos cover topics like composition, lighting, and editing, often with a minimalist and stylish approach. Mango Street’s content is ideal for photographers who appreciate clear, to-the-point instruction without unnecessary fluff.

Thomas Heaton

Thomas Heaton specializes in landscape photography and shares his adventures and techniques on his YouTube channel. He provides valuable tips on planning shoots, composition, and post-processing, all while exploring stunning locations around the world. Heaton’s channel is perfect for those passionate about nature and outdoor photography.

Sorelle Amore

Sorelle Amore is known for her creative self-portrait photography and unique approach to travel vlogging. Her channel offers tips on posing, lighting, and editing, as well as insights into building a personal brand and succeeding as a creative entrepreneur. Amore’s energetic and inspirational content makes her channel a must-watch for aspiring photographers and creatives.

Sean Tucker

Sean Tucker focuses on the philosophical and artistic aspects of photography. His channel features in-depth discussions on creativity, storytelling, and the emotional impact of images. Tucker’s thoughtful approach and soothing presentation make his content both insightful and inspiring for photographers seeking deeper meaning in their work.

Matti Haapoja

Matti Haapoja offers a blend of photography, videography, and travel content on his YouTube channel. He provides tutorials, gear reviews, and behind-the-scenes looks at his shoots, sharing valuable insights for both photographers and videographers. Haapoja’s energetic and engaging style makes his channel a great source of inspiration and practical advice.

Conclusion

These top photography channels on YouTube provide a wealth of knowledge, inspiration, and practical tips to help you improve your skills and stay current with industry trends. Whether you’re a beginner or an experienced photographer, these channels offer valuable content to support your photographic journey.

More Details
Jul 3, 2024
Why Photography is a Valuable Skill

Photography is more than just a hobby; it’s a valuable skill that offers numerous personal, professional, and societal benefits. Here are several reasons why photography is an essential and enriching skill to develop:

Creative Expression and Artistic Development

Photography allows individuals to express their creativity and develop their artistic vision. Through the lens, photographers can experiment with composition, lighting, color, and subject matter, honing their ability to create visually compelling images. This creative expression not only enhances personal fulfillment but also cultivates a unique artistic perspective that can be applied to other areas of life and work.

Technical Proficiency and Problem-Solving

Photography involves mastering various technical aspects, such as understanding exposure, aperture, shutter speed, ISO, and focusing techniques. Learning to use different cameras, lenses, and editing software also requires technical proficiency. This knowledge fosters problem-solving skills, as photographers must often adapt to changing conditions, troubleshoot equipment issues, and make quick decisions to capture the perfect shot.

Enhanced Observation and Attention to Detail

Photographers develop a keen eye for detail and an enhanced ability to observe their surroundings. This heightened awareness helps them notice subtle elements and compositions that others might overlook. These observational skills are valuable in many fields, from design and marketing to science and research, where attention to detail and keen observation are crucial.

Effective Communication and Storytelling

Photography is a powerful medium for communication and storytelling. A well-composed photograph can convey emotions, tell a story, and capture the essence of a moment without the need for words. This ability to communicate visually is a valuable skill in various professions, including journalism, marketing, advertising, and social media, where compelling imagery is essential for engaging audiences and conveying messages.

Memory Preservation and Historical Documentation

Photography plays a crucial role in preserving memories and documenting history. Personal photographs capture significant moments in our lives, creating a visual record that can be cherished and shared with future generations. Professionally, photographers document important events, cultural practices, and historical milestones, contributing to the collective memory and historical record of society.

Professional Opportunities and Career Advancement

Photography offers a wide range of professional opportunities and career paths. Skilled photographers can work in diverse fields, such as portrait, wedding, commercial, fashion, and wildlife photography. Photojournalism, documentary photography, and fine art photography are other specialized areas. Additionally, strong photography skills can enhance careers in marketing, advertising, media, and content creation, where high-quality visuals are in demand.

Personal Fulfillment and Lifelong Learning

Engaging in photography provides personal fulfillment and a sense of accomplishment. The continuous learning and improvement involved in mastering photography keep the mind active and engaged. Photographers constantly seek new techniques, explore different styles, and push creative boundaries, making it a lifelong journey of growth and discovery.

Social Connections and Community Building

Photography fosters social connections and community building. Photographers often join clubs, attend workshops, and participate in photo walks, where they share knowledge, exchange ideas, and provide feedback. These interactions create a supportive network and build lasting relationships with like-minded individuals who share a passion for photography.

Mindfulness and Well-being

Photography encourages mindfulness and well-being by promoting presence and awareness in the moment. Focusing on capturing a scene or subject helps reduce stress and distractions, providing a therapeutic and meditative experience. This mindful practice can improve mental health and overall well-being, contributing to a balanced and fulfilling life.

Influence and Advocacy

Photography has the power to influence public opinion and advocate for change. Powerful images can raise awareness about social, environmental, and political issues, inspiring action and driving change. Photographers can use their skills to highlight injustices, celebrate achievements, and promote causes they care about, making a meaningful impact on society.

In conclusion, photography is a valuable skill that offers creative expression, technical proficiency, enhanced observation, effective communication, memory preservation, professional opportunities, personal fulfillment, social connections, mindfulness, and the ability to influence and advocate for change. Developing photography skills enriches your life, opens up new opportunities, and allows you to contribute to the world in meaningful ways.

More Details
Jul 2, 2024
Best Practices for Astrophotography

Astrophotography is the art and science of capturing images of celestial objects and the night sky. It requires careful planning, technical knowledge, and patience to achieve stunning photographs of stars, galaxies, and other astronomical phenomena. This guide explores best practices to help you master the art of astrophotography and capture breathtaking images of the cosmos.

Understanding Astrophotography

Astrophotography involves photographing celestial objects such as stars, planets, nebulae, and galaxies using specialized equipment and techniques. It allows photographers to capture the beauty and mysteries of the universe that are often invisible to the naked eye. Mastering astrophotography requires an understanding of astronomy, camera settings, and post-processing techniques tailored to capturing images in low-light conditions.

Choosing the Right Equipment

Selecting the right equipment is crucial for successful astrophotography. Invest in a DSLR or mirrorless camera with manual controls and a high ISO sensitivity to capture faint light from distant celestial objects. Use a sturdy tripod to keep your camera stable during long exposures and reduce vibrations that can blur images. Consider additional equipment such as a telephoto lens, wide-angle lens, or a telescope with a motorized mount for tracking celestial objects.

Planning Your Astrophotography Session

Planning is essential for astrophotography to maximize your chances of capturing clear and detailed images of the night sky. Choose a location away from light pollution, such as a dark sky reserve or a rural area with minimal artificial light. Use astronomy apps or websites to identify celestial events, moon phases, and optimal viewing times for specific objects like the Milky Way, planets, or meteor showers. Check weather forecasts to ensure clear skies and optimal shooting conditions.

Mastering Camera Settings

Understanding and mastering camera settings is key to achieving sharp and well-exposed astrophotographs. Use manual mode to control exposure settings such as aperture, shutter speed, and ISO sensitivity. Set your aperture to its widest setting (lowest f-number) to collect the most light, adjust shutter speed to prevent star trails (typically 15-30 seconds for stars), and increase ISO sensitivity to capture faint details without introducing excessive noise. Experiment with different settings to find the optimal balance for your desired astrophotography subjects.

Focusing on Astrophotography Techniques

Astrophotography techniques vary depending on the celestial objects you intend to photograph. For deep-sky objects like galaxies and nebulae, use long exposures and stacking techniques to enhance details and reduce noise. For capturing stars and constellations, use star-tracking mounts or manual tracking to prevent star trails during longer exposures. Experiment with different compositions, framing techniques, and light painting to create compelling and artistic astrophotographs.

Processing and Editing Astrophotographs

Post-processing is essential for refining and enhancing astrophotographs to reveal details and reduce noise captured in low-light conditions. Use specialized astrophotography software such as Adobe Photoshop, Lightroom, or dedicated stacking programs to align and stack multiple exposures, adjust colours, enhance contrast, and reduce noise. Preserve the natural beauty and integrity of celestial objects while enhancing their visual impact through careful editing and processing techniques.

Conclusion

In conclusion, astrophotography offers a mesmerizing glimpse into the wonders of the universe, allowing photographers to capture stunning images of celestial objects and the night sky. By understanding astrophotography principles, choosing the right equipment, planning your sessions, mastering camera settings, focusing on techniques tailored to different subjects, and processing your images effectively, you can create captivating astrophotographs that inspire awe and curiosity. Embrace the challenges and rewards of astrophotography, explore the cosmos through your lens, and share the beauty of the universe with others through your unique photographic perspective.


More Details
Jul 2, 2024
How to Photograph Urban Scenes

Urban photography captures the essence and vibrancy of city life, showcasing architecture, street scenes, people, and cultural elements. Whether you’re exploring bustling streets, iconic landmarks, or hidden corners, mastering the art of urban photography requires a blend of creativity, technical skill, and an eye for capturing the essence of urban environments.

Understanding Urban Photography

Urban photography focuses on capturing the unique character and energy of cities through visual storytelling. It involves documenting urban landscapes, architecture, street life, and the interactions between people and their environments. Urban photographers aim to convey the atmosphere, diversity, and cultural dynamics of urban settings through their images.

Choosing Your Urban Settings

Selecting the right urban settings is crucial for capturing compelling photographs. Explore iconic landmarks, historic neighbourhoods, modern architecture, street markets, and vibrant cultural hubs that define the city’s identity. Look for contrasting elements such as old vs. new, traditional vs. contemporary, and natural vs. man-made to add depth and interest to your urban compositions.

Mastering Composition and Framing

Composition plays a vital role in urban photography, guiding the viewer’s eye through the image and highlighting key elements of the scene. Experiment with framing techniques such as leading lines, symmetry, reflections, and framing within a frame to create visually engaging compositions. Use natural frames like archways, windows, or trees to draw attention to your main subject and add depth to your photographs.

Capturing Street Life and Candid Moments

Street photography is an integral part of urban photography, capturing candid moments, interactions, and daily life in the city. Blend into the environment, observe people’s behaviour and gestures, and anticipate moments that reflect the authentic spirit of urban life. Use a telephoto lens or discreet shooting techniques to capture candid portraits and street scenes without disrupting the natural flow.

Utilizing Light and Shadows

Lighting is crucial in urban photography, influencing mood, atmosphere, and the visual impact of your images. Experiment with natural light during different times of day, such as golden hour for warm, soft light or nighttime for dramatic cityscape shots with illuminated buildings and streets. Embrace shadows to create depth, contrast, and intrigue within your urban compositions.

Enhancing Urban Details and Textures

Pay attention to details and textures that define urban environments. Capture architectural details, street art, graffiti, textures of building facades, or intricate patterns in urban landscapes. Use close-up shots and selective focus to emphasize these details, adding authenticity and storytelling elements to your urban photographs.

Editing Urban Photographs Effectively

Post-processing is essential for refining and enhancing urban photographs. Use editing software to adjust exposure, contrast, colour balance, and sharpness to achieve the desired mood and visual impact. Pay attention to preserving the authenticity of the scene while enhancing its appeal and vibrancy. Experiment with black-and-white conversions, filters, and creative effects to emphasize the urban character of your photographs.

Conclusion

Photographing urban scenes offers endless opportunities for creativity and storytelling, capturing the dynamic spirit and cultural diversity of cities around the world. By understanding urban photography principles, selecting compelling settings, mastering composition techniques, capturing street life, utilizing light and shadows, emphasizing details, and editing effectively, you can create captivating images that reflect the essence of urban environments. Embrace the energy and uniqueness of urban life through your lens, capturing moments that inspire, provoke thought, and celebrate the vibrant tapestry of city living.


More Details
Jul 2, 2024
Top Techniques for Abstract Photography

Abstract photography offers a creative and expressive way to capture images that diverge from traditional representations of reality. Using shapes, colours, patterns, and textures, abstract photography challenges viewers to see ordinary subjects in new and unexpected ways. Here are the top techniques to master abstract photography and create visually compelling images.

Understanding Abstract Photography

Abstract photography focuses on capturing elements of a subject in a way that emphasizes form, colour, texture, and lines rather than depicting it in a literal sense. It encourages photographers to experiment with compositions, perspectives, and techniques to evoke emotions and interpretations through visual elements.

Experimenting with Close-Ups and Macro Photography

Close-up and macro photography are effective techniques in abstract photography, allowing you to capture intricate details, textures, and patterns that are often overlooked. Get up close to your subject, whether it’s a natural object, texture, or everyday item, and explore its abstract qualities through selective focus and shallow depth of field.

Using Motion and Blur Creatively

Introducing motion and blur into your photographs can create dynamic and abstract effects. Experiment with intentional camera movement (ICM), panning, or long exposures to blur lines, shapes, and colours. Use this technique to convey a sense of movement, energy, or abstraction that transcends the static nature of traditional photography.

Playing with Light and Shadow

Light and shadow play a crucial role in abstract photography by shaping forms, highlighting textures, and creating contrast. Experiment with different light sources, such as natural sunlight, artificial lights, or reflections, to cast shadows and reveal intricate details. Use shadows to add depth, drama, and mystery to your abstract compositions.

Exploring Reflections and Distortions

Reflections and distortions offer unique opportunities for abstract photography by transforming familiar subjects into unfamiliar and visually intriguing images. Use reflective surfaces like water, glass, or polished metal to capture distorted reflections that warp shapes and colours, creating surreal and abstract compositions.

Abstracting Through Multiple Exposures

Multiple exposures involve overlaying several images onto a single frame to create layered and ethereal effects. Experiment with multiple exposures in-camera or through post-processing techniques to blend textures, colours, and forms into a cohesive abstract composition. Use this technique to evoke complexity, depth, and a sense of interconnectedness in your photographs.

Post-Processing for Abstract Effects

Post-processing plays a vital role in enhancing abstract photography by refining colours, contrast, and composition. Use editing software to adjust saturation, hue, and brightness to achieve the desired mood and aesthetic. Experiment with filters, textures, and blending modes to add depth and surrealism to your abstract images while preserving their artistic integrity.

Conclusion

In conclusion, mastering abstract photography requires creativity, experimentation, and a willingness to see the world through a different lens. By understanding abstract photography principles, and experimenting with close-ups, motion, light, reflections, multiple exposures, and post-processing techniques, you can create captivating and thought-provoking images that challenge perceptions and inspire imagination. Embrace the freedom of abstract photography to express your artistic vision and explore the limitless possibilities of capturing the essence of subjects in unconventional and innovative ways.


More Details
Jul 2, 2024
How to Plan a Photography Road Trip

Planning a photography road trip combines the thrill of travel with the passion for capturing stunning images along the way. Whether you’re exploring landscapes, urban scenes, or wildlife, a well-planned road trip can provide endless opportunities for memorable photographs. Here’s how to plan and execute a successful photography road trip.

Choosing Your Destination and Route

The first step in planning a photography road trip is selecting a destination that aligns with your photographic interests. Research locations are known for their scenic beauty, cultural richness, and unique landmarks. Consider the time of year and weather conditions to optimize lighting and scenery for photography. Plot your route to include diverse landscapes and points of interest that offer photographic potential.

Packing Essential Photography Gear

Packing the right photography gear is crucial for a successful road trip. Ensure you have your camera body, a selection of lenses (wide-angle, telephoto, and prime lenses), a tripod for stability, spare batteries, memory cards, a lens cleaning kit, and any filters or accessories specific to your photographic style. Pack light but include essentials that will enable you to capture a variety of scenes effectively.

Timing Your Photography Stops

Timing is everything in photography. Plan your itinerary to include early mornings and late afternoons when natural light is most flattering (golden hour). Research sunrise and sunset times at your destinations to capture breathtaking landscapes bathed in soft, warm light. Be flexible with your schedule to take advantage of unexpected photo opportunities that may arise during your journey.

Researching Photogenic Locations and Subjects

Research photogenic locations and subjects along your route to maximize your photographic opportunities. Look for iconic landmarks, hidden gems, local events, and natural wonders that offer unique perspectives for your photography. Utilize online resources, photography forums, and social media to discover lesser-known spots that showcase the essence of each destination through your lens.

Embracing Spontaneity and Serendipity

While planning is essential, leave room for spontaneity and serendipitous moments during your photography road trip. Be open to exploring off-the-beaten-path locations, interacting with locals, and capturing candid scenes that unfold unexpectedly. Some of the most memorable photographs come from embracing the unexpected and allowing your creativity to flow in new and unforeseen circumstances.

Documenting Your Journey Through Photography

Photography road trips are as much about documenting your journey as they are about capturing stunning images. Tell a visual story through your photographs by capturing landscapes, people, and cultural nuances that define each place you visit. Experiment with different photography techniques, compositions, and perspectives to create a diverse and captivating narrative of your road trip.

Editing and Sharing Your Photography

Post-processing plays a vital role in enhancing your photographs and showcasing your creative vision. Use editing software to refine colours, contrast, and composition while maintaining the authenticity of your images. Organize and curate your best photos to share on social media, and photography blogs, or create a photo book to commemorate your photography road trip and inspire others with your visual journey.

Conclusion

Planning a photography road trip allows you to explore new destinations, immerse yourself in diverse cultures, and capture stunning images that tell stories of your adventures. By choosing the right destinations, packing essential gear, timing your photography stops, researching locations, embracing spontaneity, documenting your journey, and editing your photos effectively, you can create a memorable and rewarding photography road trip experience. Embark on your next photographic adventure with enthusiasm, curiosity, and a passion for capturing the beauty of the world through your lens.


More Details
Jul 2, 2024
Tricks for Food Photography

Capturing appetizing and enticing photos of food requires a blend of creativity, technique, and attention to detail. Whether you’re a food blogger, chef, or aspiring photographer, mastering food photography can elevate your culinary creations visually. Here are some essential tricks to enhance your food photography skills.

Utilizing Natural Light Effectively

Natural light is your best friend in food photography. Position your setup near a window or outdoors to benefit from soft, diffused light that enhances textures and colours without harsh shadows. Avoid direct sunlight, which can create strong contrasts and unwanted reflections. Experiment with different times of day to find the best natural light for your food.

Choosing the Right Background and Props

Selecting a suitable background and props can complement your food and add context to your photos. Opt for neutral backgrounds such as wooden boards, marble slabs, or plain surfaces to keep the focus on the food. Use complementary props like utensils, napkins, or fresh ingredients to enhance the story and theme of your dish without overwhelming the composition.

Styling Techniques to Highlight Textures

Styling your food effectively can make it look more appealing and appetizing. Highlight textures such as crispy edges, juicy centres, or creamy sauces by arranging ingredients strategically. Use garnishes like herbs, spices, or sauces to add colour and visual interest to the dish. Experiment with different plating styles to find the most photogenic presentation for each recipe.

Experimenting with Angles and Perspectives

Explore various angles and perspectives to capture the food from its best side. Shoot from overhead (flat lay) to showcase the arrangement and ingredients in a symmetrical layout. Experiment with eye-level shots to capture the details and textures up close, allowing viewers to almost taste the food through the photo. Play with angles to find the most flattering and appetizing view of your dish.

Enhancing Depth of Field and Focus

Adjusting your camera’s aperture settings can enhance the depth of field and focus on specific elements of your dish. Use a wide aperture (low f-stop like f/2.8 or f/4) to create a shallow depth of field, blurring the background and drawing attention to the main subject. Ensure critical elements like the main course or focal point are in sharp focus while maintaining a soft, pleasing background blur.

Editing for Color and Contrast

Post-processing your photos can polish and enhance the colours, contrast, and overall appeal of your food images. Use editing software to adjust the white balance to ensure accurate colours, enhance contrast to make food pop, and fine-tune saturation to bring out the vibrancy of ingredients. Avoid over-editing and maintain a natural appearance that reflects the true essence of the dish.

Capturing Details and Close-Ups

Details matter in food photography. Capture close-up shots of textures, steam rising from hot dishes, or droplets of condensation on cold beverages to evoke sensory experiences. Focus on capturing small details like grains of salt, melting cheese, or the flakiness of pastry to add depth and realism to your photos. Close-ups can transport viewers into the culinary world you’ve created.

Practicing Patience and Experimentation

Mastering food photography takes practice and experimentation. Be patient with yourself and your subjects, experimenting with different techniques, settings, and styles to discover what works best for your unique culinary creations. Embrace creativity, adapt to feedback, and continuously refine your skills to develop a distinct style that showcases food in its most delicious and appealing form.

Conclusion

Tricks for food photography combine technical expertise with artistic vision to capture the essence of culinary delights visually. By harnessing natural light, choosing appropriate backgrounds, styling effectively, and mastering editing techniques, you can elevate your food photography to new heights. Experiment with angles, focus on details and enjoy the process of capturing food in its most delectable and enticing form through the lens.


More Details